Wanna hear more about the Windows 7 KB971033 Update? Installed Windows 7 SP1 and need to activate? You have come to the right place! Scroll down below for additional information on how to update and reactivate.
Read the Windows 8 Consumer Preview Review here!
I have also written how to re-activate your Limewire Pro License Key if you lost it with the latest version here.
*Updated 2/23/11* – Windows 7 SP1 Has been released so we went ahead and updated the steps.
For those of you who installed the Microsoft Windows 7 Activation Checker update (KB971033) you can still uninstall it. The reason that viewers such as you may want to uninstall it, is because of the surround rumors that this update creates a new process/service that will slow down your system and has been rumored to monitor the user. If you haven’t installed this, you can hide and prevent the Microsoft Windows Update Windows Activation Checker (KB971033) from installing by using the directions below.
| ������������������������ |
Many of you, including Windows 7 SP1 users, need to use the EASY METHOD listed below. That is 100% guaranteed working.
1A. If you installed KB971033 Remove the patch using the steps below.
1B. If you installed SP1 and not the patch,go to step two.
2. Follow the easy method below (Windows Loader 1.9.7)
3. After that, restart your computer
4. You should be done. If not.. continue
1B. If you installed SP1 and not the patch,go to step two.
2. Follow the easy method below (Windows Loader 1.9.7)
3. After that, restart your computer
4. You should be done. If not.. continue
5. Click the activation prompt to follow the official steps to validate your windows
6. Click the option to download the Microsoft file to re-validate your windows
7. The activator will detect your Watt 2.25 key and will act accordingly (this takes up to five minutes)
8. Reboot
9. Do a windows update check and hide that damn update! (If installed KB971033)
10. Try rearming windows afterwards if that didn’t work.
=====
6. Click the option to download the Microsoft file to re-validate your windows
7. The activator will detect your Watt 2.25 key and will act accordingly (this takes up to five minutes)
8. Reboot
9. Do a windows update check and hide that damn update! (If installed KB971033)
10. Try rearming windows afterwards if that didn’t work.
=====
To Hide the Windows Update/Disable it From Ever Installing KB971033 or SP1 (But why?!):
1. Go to Windows Update
2. Click to View Your Critical Updates
3. Right Click the one Labeled “Update for Windows 7″ with update ID “KB971033″ or SP1
4. Click “hide update.”
1. Go to Windows Update
2. Click to View Your Critical Updates
3. Right Click the one Labeled “Update for Windows 7″ with update ID “KB971033″ or SP1
4. Click “hide update.”
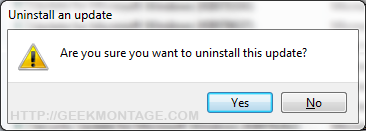
Uninstall KB971033 Windows 7 Activation Checker
For those of you who HAVE installed it and want to uninstall it
1. Go to Windows Update
2. Hit Installed Updates (link at the bottom left corner). If that link isn’t there, hit “view update history” and hit the “installed updates” link at the top.
3. Scroll down to the section titled “Microsoft Windows” and look for update KB971033.
4. Right click it and hit “uninstall”. Hit okay.
5. Reboot
6. Now check for updates again and follow the above method to hide it from installing ever again!
Note: You can also do a system restore if you are worried.
I have verified this method myself and did it before publishing this article. I personally do not want any extra processes running on my computer. =)
Enjoy!
1. Go to Windows Update
2. Hit Installed Updates (link at the bottom left corner). If that link isn’t there, hit “view update history” and hit the “installed updates” link at the top.
3. Scroll down to the section titled “Microsoft Windows” and look for update KB971033.
4. Right click it and hit “uninstall”. Hit okay.
5. Reboot
6. Now check for updates again and follow the above method to hide it from installing ever again!
Note: You can also do a system restore if you are worried.
I have verified this method myself and did it before publishing this article. I personally do not want any extra processes running on my computer. =)
Enjoy!
If you are flagged as having an Un-Genuine copy of Windows 7:
Steps that I recommend
1. Remove the patch using the steps below.
2. Follow the easy method below (Windows Loader 1.9.7)
3. After that, restart your computer
5. Click the activation prompt to follow the official steps to validate your windows
6. Click the option to download the Microsoft file to re-validate your windows
7. The activator will detect your Windows Loader 1.9.7 key and will act accordingly (this takes up to five minutes)
8. Reboot
9. Do a windows update check and hide that damn update!
10. Try rearming windows afterwards if that didn’t work.
=====
1. Remove the patch using the steps below.
2. Follow the easy method below (Windows Loader 1.9.7)
3. After that, restart your computer
5. Click the activation prompt to follow the official steps to validate your windows
6. Click the option to download the Microsoft file to re-validate your windows
7. The activator will detect your Windows Loader 1.9.7 key and will act accordingly (this takes up to five minutes)
8. Reboot
9. Do a windows update check and hide that damn update!
10. Try rearming windows afterwards if that didn’t work.
=====
Rearm Windows:
1. Copy down these instructions into notepad and save it to your desktop.
2. Go to start -> hold shift and click run (If you do not see run, simply type run in the start menu’s search box and click it while holding shift)
Note: Holding shift while clicking run opens up run in administrative mode, which is necessary for this process.
3. Type in “command” or “cmd” and press enter.
4. In the command prompt window type or right click -> paste:
1. Copy down these instructions into notepad and save it to your desktop.
2. Go to start -> hold shift and click run (If you do not see run, simply type run in the start menu’s search box and click it while holding shift)
Note: Holding shift while clicking run opens up run in administrative mode, which is necessary for this process.
3. Type in “command” or “cmd” and press enter.
4. In the command prompt window type or right click -> paste:
slmgr.vbs -rearm
10. Reboot and your good to go~!
Sponsored:
Reactivate Windows – Easy Method (easiest and guaranteed working): If you need to re-activate your windows, it has been reported that Daz’s activator works. You can easily find it on web pages. Just type “Windows Loader 1.9.7 into Google.
- After that, restart your computer, then follow the official steps to validate your windows. Microsoft will prompt you to install a file which will then legitimize your windows with the new loader.
We will NEVER post those files here and we do NOT support this. We highly encourage you to activate your windows through Microsoft by buying it.
From here on you can even go legitimize yourself in the future at Microsoft’s website. It doesn’t take long at all. You will already be legit though.
Method of Removing Genuine Activation Message
1. Copy down these instructions into notepad and save it to your desktop.
2. Go to start -> hold shift and click run (If you do not see run, simply type run in the start menu’s search box and click it while holding shift)
Note: Holding shift while clicking run opens up run in administrative mode, which is necessary for this process.
3. Type in “command” or “cmd” and press enter.
4. In the command prompt window type or right click -> paste:
1. Copy down these instructions into notepad and save it to your desktop.
2. Go to start -> hold shift and click run (If you do not see run, simply type run in the start menu’s search box and click it while holding shift)
Note: Holding shift while clicking run opens up run in administrative mode, which is necessary for this process.
3. Type in “command” or “cmd” and press enter.
4. In the command prompt window type or right click -> paste:
takeown /f “%windir%\\System32\\Wat\\*”
5. Press enter
6. Type or right click -> paste:
6. Type or right click -> paste:
icacls “%windir%\\System32\\Wat\\*” /deny *S-1-1-0
7. Press enter and reboot.
NOTE: This method has worked for some people but not others.
NOTE: This method has worked for some people but not others.
Method of Inputting Your Legitimate Product Key
Step 1. Right click My Computer and click Properties
Step 2.Scroll down to wher eit lists your current product key
Step 3.Hit “Change Product Key”
Step 4.Insert your new product key there
Step 5.Reboot Your Computer
Step 1. Right click My Computer and click Properties
Step 2.Scroll down to wher eit lists your current product key
Step 3.Hit “Change Product Key”
Step 4.Insert your new product key there
Step 5.Reboot Your Computer
If you have changed your Windows Key and want to re-validate:
1. Go to start -> hold shift and click run (If you do not see run, simply type run in the start menu’s search box and click it while holding shift)
Note: Holding shift while clicking run opens up run in administrative mode, which is necessary for this process.
2. Type in “command” or “cmd” and press enter.
3. Type the following or right click -> Paste:
1. Go to start -> hold shift and click run (If you do not see run, simply type run in the start menu’s search box and click it while holding shift)
Note: Holding shift while clicking run opens up run in administrative mode, which is necessary for this process.
2. Type in “command” or “cmd” and press enter.
3. Type the following or right click -> Paste:
%SystemRoot%\\system32\\Wat\\WatAdminSvc.exe /run
4. Hit enter and reboot.
If you need to update your bios OEM serial key:
1. Go to start -> hold shift and click run (If you do not see run, simply type run in the start menu’s search box and click it while holding shift)
Note: Holding shift while clicking run opens up run in administrative mode, which is necessary for this process.
2. Type in “command” or “cmd” and press enter.
3. Type in the following command:
1. Go to start -> hold shift and click run (If you do not see run, simply type run in the start menu’s search box and click it while holding shift)
Note: Holding shift while clicking run opens up run in administrative mode, which is necessary for this process.
2. Type in “command” or “cmd” and press enter.
3. Type in the following command:
slmgr -ipk XXXXX-XXXXX-XXXXX-XXXXX-XXXXX
Remove Windows Activation Notification Mode
1. Go to start -> hold shift and click run (If you do not see run, simply type run in the start menu’s search box and click it while holding shift)
Note: Holding shift while clicking run opens up run in administrative mode, which is necessary for this process.
2. Type in “command” or “cmd” and press enter.
3. Type the following or right click -> Paste:
1. Go to start -> hold shift and click run (If you do not see run, simply type run in the start menu’s search box and click it while holding shift)
Note: Holding shift while clicking run opens up run in administrative mode, which is necessary for this process.
2. Type in “command” or “cmd” and press enter.
3. Type the following or right click -> Paste:
takeown /F %WINDIR%\\System32\\sppcomapi.dll && icacls %WINDIR%\\System32\\sppcomapi.dll /deny *S-1-1-0:F
4. Hit enter and reboot
Note: You can re-enable this by typing:
Note: You can re-enable this by typing:
icacls %WINDIR%\\System32\\sppcomapi.dll /grant *S-1-1-0:F
Remove the WatU scheduled key checker:
1. Go to start -> hold shift and click run (If you do not see run, simply type run in the start menu’s search box and click it while holding shift)
Note: Holding shift while clicking run opens up run in administrative mode, which is necessary for this process.
2. Type in “command” or “cmd” and press enter.
3. Copy and right click-> paste the following into command prompt:
1. Go to start -> hold shift and click run (If you do not see run, simply type run in the start menu’s search box and click it while holding shift)
Note: Holding shift while clicking run opens up run in administrative mode, which is necessary for this process.
2. Type in “command” or “cmd” and press enter.
3. Copy and right click-> paste the following into command prompt:
schtasks /change /disable /tn “\\Microsoft\\Windows\\Windows Activation Technologies\\ValidationTask” && schtasks /change /disable /tn “\\Microsoft\\Windows\\Windows Activation Technologies\\ValidationTaskDeadline”
Delete WAT Registry Entries
Windows Activator logs all kinds of stuff about you… this is how to delete those logs.
1. Go to start -> hold shift and click run (If you do not see run, simply type run in the start menu’s search box and click it while holding shift)
Note: Holding shift while clicking run opens up run in administrative mode, which is necessary for this process.
2. Type in “command” or “cmd” and press enter.
3.Right click -> paste the following into command prompt:
Windows Activator logs all kinds of stuff about you… this is how to delete those logs.
1. Go to start -> hold shift and click run (If you do not see run, simply type run in the start menu’s search box and click it while holding shift)
Note: Holding shift while clicking run opens up run in administrative mode, which is necessary for this process.
2. Type in “command” or “cmd” and press enter.
3.Right click -> paste the following into command prompt:
REG DELETE “HKLM\\SOFTWARE\\Microsoft\\Windows NT\\CurrentVersion\\Windows Activation Technologies” /f
We will NEVER post those files here and we do NOT support this. We highly encourage you to activate your windows through Microsoft by buying it.
Incoming search terms:
- KB971033
- remove wat
- windows 7 activation
- how to remove windows 7 genuine notification
- windows 7 activator
- windows 7 not genuine fix
- removewat
- windows activation update
- remove windows 7 genuine notification
- activate windows 7
- remove wga windows 7
- remove KB971033
- uninstall kb971033
- remove windows 7 activation


